头部背景图片

A powerful assistant for textile color fastness testing

2025-04-17

As consumers, if we just bought a piece of clothing and it fades seriously after washing it a few times, or the color is stained on other clothes after rubbing against other clothes, it will definitely be a very bad experience for consumers.

Therefore, color fastness is a key indicator in the production and quality control of textiles and is very important. As a powerful assistant for textile color fastness testing, AATCC Crockmeter plays an indispensable role in ensuring the quality of textiles.


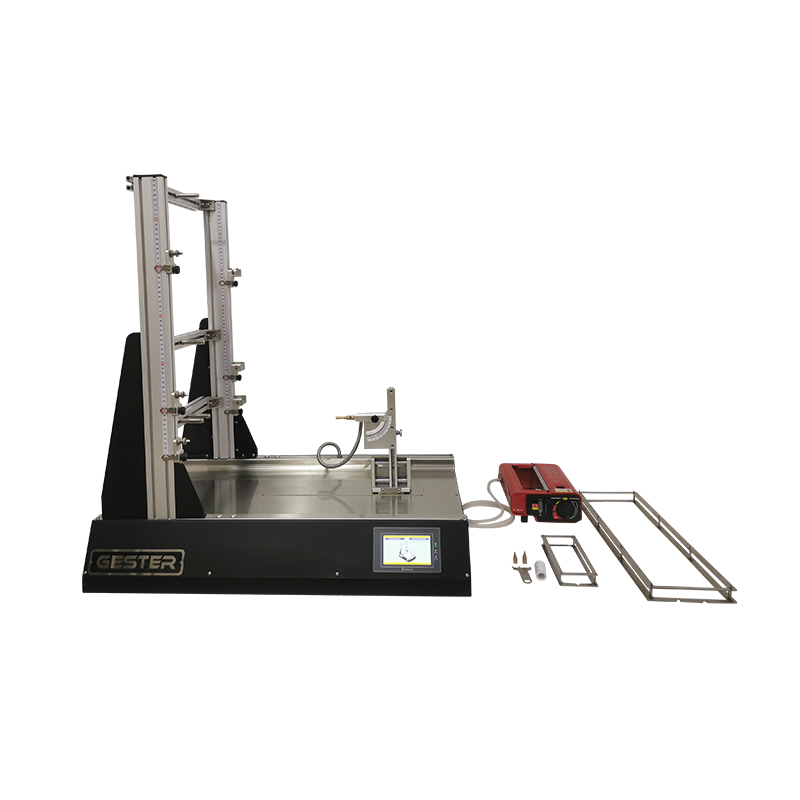
1. What is AATCC Crockmeter?

AATCC Crockmeter is an instrument used to measure the amount of color transferred from the surface of a colored textile material to other surfaces through friction.


2. Working Principle of AATCC Crockmeter

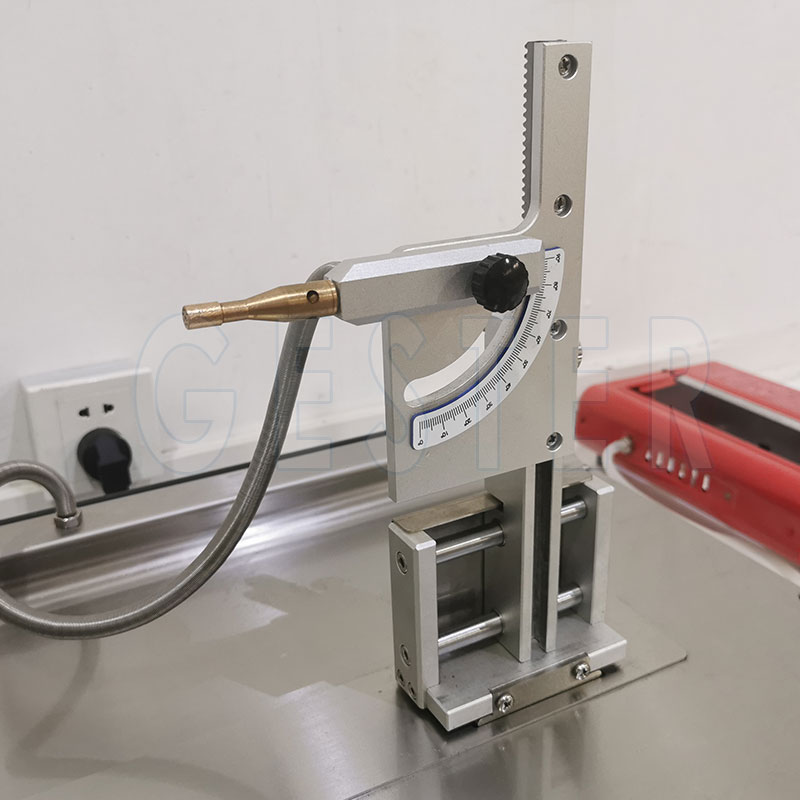
The working principle of AATCC Crockmeter is to rub the colored test sample with a white friction test cloth under specific controlled conditions. After that, the color transferred to the white test cloth is evaluated by comparing with the gray grading card for dyeing or the color transfer grading table, and then the color fastness grade is determined.


3. Wide application scenarios

In the textile industry, AATCC Crockmeter is widely used from yarn production to final garment production. For yarn manufacturers, the test can help them understand the color stability of yarn after dyeing in the subsequent processing process, and avoid color problems in weaving and other links. For fabric manufacturers, color fastness is an important quality indicator for both ordinary woven fabrics and new functional fabrics. In the clothing production process, brand owners can use AATCC Crockmeter to conduct random inspections on purchased fabrics to ensure that the finished garments will not fade seriously during consumers' daily wear and washing.


4. Brief introduction to the operation process of Fabric Crockmeter:

  • Sample preparation: First, cut two samples of at least 13×5cm in size, one for dry friction test and the other for wet friction test.
  • Sample installation: Place the sample flat on the fixed position of the friction meter and fix the sample.
  • Test: Shake the friction arm 10 times at a rate of once per second, and rub the friction arm back and forth 20 times
  • Evaluation results: After the test, there may be some fibers stuck to the friction white cloth. At this time, these fibers need to be disposed of first to avoid affecting the evaluation. Then, place three layers of unused white rubbing cloth under the white rubbing cloth to be evaluated, and refer to the AATCC standard dyeing gray card to evaluate the dyeing grade of the white rubbing cloth. The evaluation of dry and wet friction fastness should be carried out on the two test results of the same sample.


AATCC Crockmeter plays a vital role in the field of textile color fastness testing. With its accurate test results, wide range of applications, simple operation process and reliable quality, it has become a powerful tool for quality control in the textile industry. For textile companies, making good use of AATCC Crockmeter, this powerful assistant, is to protect product quality and win more advantages for enterprises in market competition.


Any demand can be referred to us!

Sales Dept Tel: +86 15280858852

Email: sales@avenotester.com

Skype: sales@avenotester.com

Web: www.avenotester.com

About Zipper Fatigue Tester

2025-04-17

Zippers play an important role in our daily lives. Whether it is clothing, bedding, bags, accessories, etc., they are inseparable from the use of zippers. Therefore, the quality of zippers is crucial to the consumer experience. Usually, manufacturers use zipper fatigue testers to evaluate the quality of zippers to select high-quality products.

So what is a Textile Zipper Fatigue Tester?

Zipper Fatigue Tester


The Zipper Durable Instruments tests whether various types of zippers can withstand a specified number of reciprocating pulls under the action of lateral and longitudinal tension. The standards that meet the requirements are: CNS -1083, BS 3084, QB/T2171, 2172, 2173. This test process helps manufacturers evaluate the fatigue resistance of zippers and identify potential design defects or weaknesses that may lead to premature failure.

Main technical parameters:

1) Reciprocating stroke: 75mm

2) Width of transverse clamping device: 25mm

3) Total weight of longitudinal clamping device: 0.28~0.34kg;

4) The distance between the two clamping devices: 6.35mm;

5) Counting times: 1~999999 times

6) Instrument size: 28×55×66cm Weight: 35kg


Zipper Fatigue Tester operation interface:

Textile Zipper Fatigue Tester

Zipper Durable Instruments


Any demand can be referred to us!

Sales Dept Tel: +86 15280858852

Email: sales@avenotester.com

Skype: sales@avenotester.com

Web: www.avenotester.com


Textile material guardian

2025-04-17

In the use of textiles, the pilling performance of fabrics is a key indicator to measure their quality. The most intuitive is to affect the appearance of the fabric, and then affect its durability and comfort. As the core testing equipment in the field of textiles, the textile rolling box pilling tester plays a great role.


The ICI Pilling tester for Fabric is used for pilling test of wool, knitted fabrics and other fabrics that are easy to pill, so as to evaluate the pilling grade of the fabric under no pressure.

ICI Pilling tester for Fabric

The ICI Pilling and Snagging Test Equipment simulates the state of fabrics in daily use and friction. It consists of multiple rollers with precise internal structure. The roller walls are usually made of special materials to provide uniform and stable friction conditions. The instrument is equipped with a precise drive system, which can adjust the roller speed to simulate different degrees of friction. It also has a timing device to accurately control the test time.


So, how to conduct the test?

1. Preparation: Cut the fabric sample to ensure accurate size. According to the fabric type and test standard, select the appropriate friction cloth and put it into the rolling box.


2. Test process: Put the sample fixture into the rolling box and close the door. Test and start the instrument according to the standard requirements, closely observe the running status of the rolling box, and ensure that the sample is rubbed normally without abnormal jumping or jamming. The machine is equipped with an emergency stop button. If any abnormality occurs, stop the machine immediately for inspection.


3. Result evaluation: After the test, take out the sample and compare it with the pilling rating sample under the standard light source to evaluate the size, quantity, distribution and other aspects of the pilling on the fabric surface to determine the pilling grade of the fabric.


In clothing manufacturing, both high-end fashion brands and mass-market fast-moving consumer goods need to use Pilling and Snagging Tester to test fabrics to ensure clothing quality. In fabric production companies, this instrument is used for new product development and quality control to ensure that the fabrics shipped meet industry standards. In addition, bedding, curtains and other fabrics in the home textile industry also rely on pilling testers to improve product durability and aesthetics.


Any demand can be referred to us!

Sales Dept Tel: +86 15280858852

Email: sales@avenotester.com

Skype: sales@avenotester.com

Web: www.avenotester.com

The behind-the-scenes judge of rubber quality

2025-04-17

In the use of rubber products, their quality not only affects the performance of the product, but is also closely related to our daily life. How to ensure the quality of rubber products requires the help of a behind-the-scenes referee---Rubber Vertical Rebound Resilience Tester.

Vertical Rebound Tester

The Vertical Rebound Resilience Tester is a professional device specially used to test the vertical elastic properties of rubber materials. Its basic principle is based on free fall motion and the law of conservation of energy. An impact body of a specified mass is freely dropped from a certain height to impact the rubber sample being tested. The vertical elastic recovery rate of the rubber is calculated by measuring the height of the impact body's rebound. This seemingly simple testing method contains profound scientific principles and provides objective and accurate data support for the performance evaluation of rubber materials.

Test steps of Vertical Rebound Tester:

1. Sample preparation

  • Prepare at least 3 specimens, the diameter should be greater than 40mm and the thickness should be 12.5mm
  • Use a sharp knife to cut several specimens of the same size in each area;
  • If the specimen is not flat enough, use a grinder to grind the upper and lower surfaces of the specimen to be prepared, and keep the upper and lower specimens parallel to each other;
  • Place the ground specimen in a standard environment with a temperature of (23±2)℃ and a relative humidity of 50% for at least 3 hours.


2. Test steps:

  • Place the instrument on a horizontal platform and adjust the instrument level;
  • Adjust the height to raise the weight to a fixed height.
  • Take out the prepared sample.
  • Remove the test piece fixture. When placing the test piece, make sure that the drop point is 14mm away from the edge of the test piece.
  • First test the data three times to observe whether the weight is in a completely free fall state. Observe the data stability with the naked eye. After confirming that the instrument is completely horizontal, start the sample test.
  • Ensure that the average value of the rebound height of each rebound is taken as the final evaluation data value of the product after three tests at the same position.


Any demand can be referred to us!

Sales Dept Tel: +86 15280858852

Email: sales@avenotester.com

Skype: sales@avenotester.com

Web: www.avenotester.com


Advantages of Universal Testing Machine

2025-04-17
Advantages of Universal Testing Machine (UTM)


A Universal Testing Machine (UTM) is a versatile and widely used piece of equipment in materials testing. It can perform a variety of tests, including tension, compression, bending, and shear tests, on different materials such as metals, plastics, and composites. Here are some key advantages of using a Universal Testing Machine for Tensile Test:

1. Versatility
Multi-Functional: A Universal Testing Machine for Tensile Test can conduct a wide range of tests, making it a highly versatile tool in both research and industrial settings. It can test materials under different loading conditions, including tensile, compressive, and flexural loads.
Wide Range of Materials:Universal Testing Machines for Tensile Test can test various materials such as metals, polymers, textiles, rubber, and composites, making it an essential tool across multiple industries.

2. High Precision and Accuracy
Accurate Measurements: UTMs are designed to provide highly accurate measurements of material properties like tensile strength, yield strength, and elongation at break. This accuracy is critical in ensuring the reliability and safety of materials used in manufacturing and construction.
Consistent Results: Universal Testing Machines for Tensile Test are equipped with advanced load cells and extensometers that ensure consistent and repeatable test results, which is essential for quality control and material certification.

3. User-Friendly Interface
Ease of Operation: Modern universal testing machines come with user-friendly software interfaces that allow operators to easily set up tests, monitor progress, and analyze results. This reduces the learning curve and allows for efficient operation even by less experienced technicians.
Automation Capabilities: Many universal testing machines offer automation features that enable the machine to run tests with minimal manual intervention, increasing productivity and reducing the likelihood of human error.

4. Data Collection and Analysis
Comprehensive Data Output: universal testing machines can record and output a wide range of data points, which can be used for detailed analysis of material properties. This data is crucial for understanding the performance characteristics of materials under different conditions.
Real-Time Monitoring: Advanced universal testing machines provide real-time monitoring of test parameters, allowing for immediate adjustments and analysis during the testing process.

5. Durability and Longevity
Robust Construction: universal testing machines are built to withstand heavy use and harsh testing environments. Their robust construction ensures long-term reliability and minimal maintenance, providing a good return on investment.
Adaptability: Universal testing machines can be upgraded or customized with additional accessories and fixtures to accommodate new testing standards or material types, making them a future-proof solution for testing laboratories.

6. Compliance with Standards
Standardized Testing: Universal testing machines are designed to meet international testing standards such as ASTM, ISO, and DIN. This ensures that the tests performed are in compliance with global industry requirements, which is crucial for product certification and regulatory approval.

Standards:
ISO13934-1, 13934-2, 13935-1, 13935-2, 13936-1, 13936-2, 13936-3, 13937-2, 13937-3, 13937-4, 1421, 2411, 2062, 4674-1, 5082, 9073.3, 9073.4, 9073.18
ASTM D 434, D751, D885 , D1683, D2256, D2261, D2724, D2731, D3787, D4034, D4964, D5034, D5035, D5587, D5733, D5735 .
BS 2543, 2576, 3320, 3424, 4303 , 4304,
M&S P11, P12, P13, P14
JIS L1096

7. Economic Efficiency
Cost-Effective: By consolidating multiple testing functions into a single machine, universal testing machines reduce the need for separate equipment for different tests, thereby saving space and cost. Additionally, the high accuracy and reliability of universal testing machines reduce material wastage and the cost of failed products.

GESTER: Leading Manufacturer of Universal Testing Machines
Industry Expertise: GESTER is a prominent manufacturer of Universal Testing Machines, known for its innovation and quality. Our company has a strong reputation for producing reliable and advanced UTMs that meet the rigorous demands of various industries.

Customized Solutions: GESTER provides customized solutions tailored to the specific needs of its clients, ensuring that their UTMs deliver optimal performance for the intended applications.

Global Presence: With a global customer base, GESTER has established itself as a trusted provider of testing equipment, offering comprehensive support and services to ensure customer satisfaction.

Comprehensive Guide for Using the Vertical Combustibility Tester GT-C35B

2025-04-17
Comprehensive Guide for Using the Vertical Combustibility Tester

In the world of material safety testing, ensuring the accuracy and reliability of results is critical. The Vertical Combustibility Tester GT-C35B is an advanced instrument designed to determine the flammability of vertically oriented fabrics, making it ideal for textiles, soft fabric toys, and protective clothing industries. To maximize the effectiveness of this tester, proper training is essential. This article outlines the process of training customers to use the Vertical Combustibility Tester GT-C35B, while emphasizing the importance of after-sales support to ensure consistent performance and long-term reliability.


1. Understanding the Vertical Combustibility Tester GT-C35B
The GT-C35B Vertical Combustibility Tester is engineered to evaluate the flame resistance of materials. It is designed to comply with several international standards, including BS EN ISO 6940, 6941, 15025, 14116, and others, ensuring its global applicability.

2. Step-by-Step Training Process

Providing customers with a comprehensive training program is crucial for the optimal use of the Vertical Combustibility Tester GT-C35B. This step-by-step guide ensures that the user can accurately conduct tests and interpret results effectively:


Step 1: Sample Installation
Use the provided sample splint to mark a positioning hole on the material. This ensures that the sample is aligned correctly for testing.
After marking, install the sample securely on the sample clip. Proper alignment is critical for obtaining consistent and accurate test results.

Step 2: Hanging the Sample
Attach the sample to the tester’s frame, ensuring that it is suspended properly. This vertical orientation is essential for simulating real-life exposure to fire.

Step 3: Adjusting the Nylon Line
Adjust the scale line (marking line) by pulling the nylon line. The micro switch should be extended to a distance of approximately 5mm. This adjustment ensures that the nylon line is tight enough for the test procedure.

Step 4: Burner Angle Adjustment
The burner must be aligned at the correct angle to simulate fire exposure. Adjust the angle as per the material's requirements, ensuring consistent flame exposure throughout the test.

Step 5: Inserting the Copper Flame Gauge
Place Flame Gauge 1 (Copper) into the tester. This gauge helps measure the flame properties to ensure it meets the specified standards for testing.

Step 6: Positioning the Burner
Using the machine's controls, fine-tune the burner’s position in both vertical and horizontal planes. This precise adjustment ensures that the flame is directed accurately onto the sample.

Step 7: Burner Return to Default Position
After adjustment, press the return button to automatically return the burner to its default position, preparing it for the next test.

Step 8: Removing the Copper Flame Gauge
Once the burner has been positioned and calibrated, remove Flame Gauge 1 (Copper) to proceed with the test.

Step 9: Air Source Adjustment
Open the air source and adjust the airflow rate to match the testing parameters. Controlling the air source is crucial to maintaining the proper flame intensity during testing.

Step 10: Opening the Solenoid Valve
Activate the solenoid valve to ensure that the air supply to the burner is consistent and reliable throughout the testing process.

Step 11: Ignition and Flame Length Adjustment
Ignite the burner using the flow meter to adjust the flame length. For precision, use Flame Gauge 2 (Stainless Steel) to verify the flame length before commencing the test.

Step 12: Setting Ignition Time
Program the ignition time based on the material being tested. Different materials have varying resistance to fire, so this setting must be adjusted accordingly.

Step 13: Test Initiation
Press the start button to begin the test. The Vertical Combustibility Tester will automatically monitor the flame’s impact on the sample material.

Step 14: Completing the Test
The test concludes when all three marking lines on the material are burned through. This indicates that the material’s combustibility has been measured, and the data is ready for analysis.

By providing comprehensive training and superior after-sales support, customers can maximize the efficiency and effectiveness of this critical piece of testing equipment.

How to Operate the GT-KA01-2 Whole Shoes Flexing Tester for Shoe Durability Testing

2025-04-17

How to Operate the GT-KA01-2 Whole Shoes Flexing Tester for Shoe Durability Testing


The GT-KA01-2 Whole Shoes Flexing Tester is an essential machine used in the footwear industry to evaluate the durability and flexibility of shoes under repetitive stress. As the demand for high-quality footwear increases, manufacturers must rely on precise testing equipment to ensure their products meet rigorous quality standards. This article provides a detailed guide on the features, application scenarios, and operation of the shoes flexing tester, helping users maximize the efficiency and accuracy of their testing procedures.

Features and Benefits of the GT-KA01-2 Flexing Tester
1. Acrylic Protective Cover: The Finished Shoes Flex Tester is equipped with a clear acrylic cover that ensures safe operation while reducing noise.

2. Heel Fixture with Linear Slide: The heel fixture uses a linear slide mechanism, allowing for smooth movement with minimal resistance. This design improves the precision of the test and ensures consistent results during repeated tests.

3. Automatic Stop Feature: The Whole Shoes Flexing Testing Equipment allows users to freely set the desired running times for the test, and once the test is completed, the machine automatically stops. This feature enhances convenience and reduces the need for constant monitoring, improving overall efficiency.

Operation Steps
To operate the GT-KA01-2 Whole Shoes Flexing Tester, begin by opening the machine’s cover and removing the cork. Install the cork onto the shoe’s toe cap and securely fasten it. Next, lift the locating pin and push the fixture forward to bring it close to the shoe, then use the fixture to secure the heel. On the left control box, adjust the two working options for the left side of the machine; repeat the same adjustments on the right side. Select the desired flexing angle (e.g., 30°), then use a wrench to adjust the pointer to the appropriate angle. Refer to the parameter sheet to set the corresponding size (e.g., 30° corresponds to 40). Choose either the counting or timing mode based on your requirements and set the relevant parameters. After completing the settings, click "Return," then make sure to press "Zero" before starting the test. The machine will automatically stop once the preset data is reached. Afterward, remove the test sample and observe the results.

Maintenance and Care
Proper maintenance is essential for keeping the GT-KA01-2 Whole Shoes Flexing Testing Equipment functioning efficiently over time. After each use, it's important to clean the surface of the machine, removing any dust or debris that could interfere with operations. Additionally, regularly inspect the mechanical components for wear and tear, replacing any worn parts as needed to maintain the machine’s precision and reliability. Routine calibration is also recommended to ensure that the tester continues to deliver accurate results.

How to Operate the GT-LB06A Chair Front Stability Testing Machine

2025-04-17
How to Operate the GT-LB06A Chair Front Stability Testing Machine


The GT-LB06A Chair Front Stability Testing Machine is a specialized device designed to evaluate the forward stability of chairs, ensuring they can withstand everyday use. This article provides a comprehensive guide on how to operate the Chair Front Stability Testing Machine effectively, along with insights into its importance in product testing.


Introduction to the GT-LB06A Chair Front Stability Testing Machine
The GT-LB06A Chair Front Stability Testing Machine is engineered to simulate the forces that a chair might encounter during normal usage. By understanding how to use this machine, manufacturers can ensure their products are safe and stable.

Step-by-Step Operation Guide

1. Preparation

Before beginning the testing process, make sure that you have the following:

2. Setting Up the Machine
2.1 Connect the Power Supply:
Plug the machine into a suitable power outlet.
Turn on the power switch to initiate the machine’s operation.

2.2 Marking the Chair:
Take the chair you wish to test and mark the position of the loading point 60mm from the edge. This step is crucial for accurate testing, as it indicates where the force will be applied.

3. Preparing the Chair for Testing
3.1 Positioning the Loading Pad:
Place the loading pad on the marked point. The center of the loading pad should align with the marked line on the chair.
Secure the loading pad in place using string to prevent any movement during testing.

3.2 Mounting the Chair:
Install and fix the chair onto the GT-LB06A Chair Front Stability Testing Machine. Make sure the chair is stable and securely mounted.
Adjust the chair so that its center is aligned with the weights that will be applied during the test.

4. Setting Up the Weights
4.1 Adjusting the Chair Wheels:
Ensure the chair wheels are positioned close to the stopper to avoid any unintended movement during the test.

4.2 Controlling the Weight Lifter:
Use the control to lift the weights to the specified height. It’s important to support the weights by hand as they rise to prevent them from tipping over.

4.3 Installing the Loading Head:
Select the appropriate loading head from the C-buckle and install it securely.

5. Attaching the C-buckle and Chain
5.1 Positioning the C-buckle:
Insert the C-buckle into the center hole of the loading pad.
Connect a chain from the bottom of the C-buckle, ensuring it is of suitable length. The other end of the chain should be attached to the weights.

6. Conducting the Test
6.1 Lowering the Weights:
Carefully lower the weight disc so that it is disengaged from the weights.

6.2 Applying Horizontal Force:
At the loading point on the chair, apply a horizontal force of 20N. Observe the chair’s response to this force.
Check to see if the chair tilts. If it does, this indicates instability, and further evaluation may be necessary.

6.3 Importance of Chair Stability Testing
Testing for chair stability is not just about meeting regulatory standards; it’s about ensuring the safety and comfort of users. A chair that tilts or tips over can lead to accidents and injuries, undermining consumer confidence in a brand. The GT-LB06A Chair Front Stability Testing Machine helps manufacturers identify potential flaws in design or construction before products reach the market.

What Does a UTM Machine Do?

2025-04-17

As a pioneer in testing equipment manufacturing since 2007, Suzhou TOPHUNG Machine Equipment Co., Ltd. has delivered reliable quality control solutions to global industries. Our Universal Testing Machines (UTMs) empower manufacturers to validate material performance with scientific rigor.


Core Functions of UTM Systems

  1. Fundamental Material Evaluation

  2. Advanced Structural Analysis

    • Peel strength tests for adhesives

    • Shear resistance evaluation for fasteners

    • Cyclic loading simulations for fatigue life prediction


Key Industries Served

  • New Energy: Validating solar connector durability under extreme weather simulation
  • Automotive: Testing seatbelt tensile strength and component fatigue resistance
  • Construction: Certifying steel reinforcement bars to GB/T 228.1 standards
  • Electronics: Measuring flexible PCB substrate deformation limits


TOPHUNG's Engineering Excellence

  1. Precision Control

    • 0.5-grade load cells with temperature compensation

    • Crosshead positioning accuracy ±0.05mm

    •  
  2. Adaptive Configuration

    • Modular design supports capacity from 10N to 2,000kN

    • Interchangeable grips for wires, composites and biomaterials

    •  
  3. Smart Operation

    • T-Test software preloads 50+ international standards (ISO/ASTM/GB)

    • Real-time stress-strain curve visualization

    • Multi-language report generation 

    •  
  4. Compliance Assurance

    • CE certified electrical systems

    • NIST-traceable calibration certificates

    •  
  5. Lifecycle Support

    • Onsite installation & operator training

    • Preventative maintenance programs

    • Spare parts availability guarantee

    •  

Application Scenario

A Southeast Asian cable manufacturer enhanced export compliance using our TH-8000 UTM:

  • Simultaneously met IEC 60811 and ASTM D412 requirements

  • Automated copper conductor elongation testing

  • With parallel sample analysis, the test cycle is shortened

What is the Difference Between ISO 527 and ASTM D638?

2025-04-17

As global material testing standards shape industrial quality control, understanding the nuances between ISO 527 and ASTM D638 is critical for manufacturers.  At Suzhou TOPHUNG, we’ve engineered testing solutions compliant with both standards since 2007.  Here’s a technical breakdown and why it matters for your operations.


Scope & Application:

ISO 527:


Primarily governs rigid and semi-rigid plastics testing, widely adopted in Europe and Asia.

Key industries: Automotive (e.g., dashboards), aerospace composites.

ASTM D638:


Focuses on plastic materials including films/flexible sheets, dominant in North America.

Key industries: Medical packaging, consumer electronics casings.


4 Critical Technical Differences

Specimen Geometry:

ISO 527: Requires Type 1A (170mm length) or 1B (80mm) dumbbell specimens.

ASTM D638: Uses Type I (165mm) or Type V (25mm mini-samples) for thin materials.

TOPHUNG’s Solution: Our fixtures can meet the test requirements of both samples.


Testing Speed:

ISO 527: 1 mm/min (modulus measurement) then 5-50 mm/min until break.

ASTM D638: Fixed 5 mm/min for modulus;  50-500% strain rate flexibility.

TOPHUNG Advantage: Servo motors enable 0.001-500 mm/min speed switching in 0.1s.


Strain Measurement:

ISO 527: Mandates extensometers for modulus calculation.

ASTM D638: Allows crosshead displacement if material strain <5%.

Our extensometer achieves ±0.1µm resolution, compatible with both methods.


Data Reporting:

ISO 527: Focuses on tensile modulus, yield stress, and break elongation.

ASTM D638: Additional reporting of Poisson’s ratio and secant modulus.

TOPHUNG’s T-Test software generates multiple parameters per both standards.


Why Compliance Matters

A 2023 study showed that some export rejections stemmed from poor selection of criteria standard selection.  TOPHUNG’s dual-standard systems help clients:

  • Test same material under ISO/ASTM simultaneously
  • Switch between standards via pre-loaded software profiles
  • Pass EU CE certification audits


Case Study: Automotive Supplier

A Zhejiang-based producer reduced testing time by 40% using our TH-3000 series:

Automated jigs for ISO 1B and ASTM IV specimens

AI-driven result mapping between standards

Reduce most reinspection costs annually


With 37 patented technologies and 30,000+ systems deployed globally, TOPHUNG empowers manufacturers to master international standards effortlessly.

Tags